วันพฤหัสบดีที่ 23 ตุลาคม พ.ศ. 2557

คำสั่งในการตรวจสอบไฟล์ กรณีไม่สามารถออกใบเสร็จรับเงิน กรณีผู้ป่วยค้างชำระไม่ได้


เนื่องจากพบปัญหาว่า  มีการอัพเกรดโปรแกรม Hosxp 3.57.8.22   เป็นต้นมาแล้วการเงินไม่สามารถ ออกใบเสร็จรับเงินกรณีผู้ป่วยค้างชำระได้   ซึ่งปัญหาเกิดจากได้มีการลงค้างชำระในโปรแกรมเวอร์ชั่นเก่า  ทำให้ข้อมูลบางตัวหายไป 
ใช้คำสั่ง ต่อไปนี้ Run ที่รูปสายฟ้า ของ Hosxp  แล้วตรวจสอบข้อมูลฟิลล์ ตามภาพ  

select ra.*, rad.*
from rcpt_arrear ra
join rcpt_arrear_detail rad on rad.arrear_id=ra.arrear_id

(เครดิตพี่โก้ อุดมโชค  สมหวัง  ครับ)


วันจันทร์ที่ 20 ตุลาคม พ.ศ. 2557

การตั้งค่า อัพเกรดเครื่องลูก Hosxp อัตโนมัติ

วิธีการติดตั้ง Hosxp ให้สามารถอัพเกรด เครื่องลูกข่ายอัตโนมัติ
1.  ติดตั้งเครื่อง SERVER หรือเครื่อง PC  สำหรับฝากไฟล์  โดยจำลองให้เป็นเว็บ SERVER  เพื่อสามารถดาวนโหลดข้อมูลได้
2. นำโปรแกรม Hosxp ที่ดาวน์โหลดมาใส่ไว้ในเครื่อง web server  กำหนดชื่อให้จำง่าย
3. เข้าโปรแกรม Hosxp  เข้ารูปสายฟ้า   แก้ไข ตาราง Patch ตามรูป  กำหนดเวอร์ชั่น กำหนดแหล่งข้อมูล  ตามภาพ แล้วกด Update


4. เข้าไป เข้ากำหนดใน System setting  แล้วกดบันทึก


ข้อมูลอาจไม่สมบูรณ์หน่อยครับเพราะส่วนมากผมเขียนไว้เป็นบันทึกกันลืมของผมเองครับ

วันอังคารที่ 16 กันยายน พ.ศ. 2557

คำสั่ง disable firewall iptables centos

# service iptables save
# service iptables stop
# chkconfig iptables off

f you are using IPv6 firewall, enter:
 service ip6tables save
# service ip6tables stop
# chkconfig ip6tables off

วันจันทร์ที่ 8 กันยายน พ.ศ. 2557

CentOS and RHEL 7: Install Linux, Apache, MariaDB, PHP (LAMP) Stack

entOS and RHEL 7: Install Linux, Apache, MariaDB, PHP (LAMP) Stack

by  on JUNE 23, 2014 · 10 COMMENTS· LAST UPDATED JUNE 27, 2014
Iam new Red Hat Enterprise Linux version 7 user/sysadmin/developer. This version made the big number change for RHEL 7/CentOS 7. How can I install LAMP (Linux, Apache, MariaDB, PHP) stack on a RHEL version 7 or CentOS Linux version 7 using CLI or over ssh based session?

Tutorial details
DifficultyEasy (rss)
Root privilegesYes
RequirementsCentOS/RHEL v7.x
Estimated completion time20m
RHEL 7 has been released and CentOS Linux 7 is on its way with many notable changes. This guide explains how to install LAMP server.

More about LAMP

LAMP is nothing but a software bundle or a platform consisting of Linux operating system, Apache web-server, MySQL database server and PHP (or Perl/Python)scripting language. The LAMP stack is used for building heavy-duty dynamic web sites entirely out of free and open-source software. In this tutorial, I'm going to explain how to Linux, Apache, MySQL/MariaDB (drop in replacement for MySQL), PHP (LAMP) stack On CentOS 7 or RHEL 7.

Assumptions

  • I'm assuming that you've installed basic RHEL 7 or CentOS 7 server. Open the Terminal app and type the following command as root user.
  • You must be familiar with the yum command
  • You must know your Server's IP address. Use the following command to find your server's ip address for eth0 interface:

    ifconfig eth0
    OR
    ip a show eth0
    OR
    ip addr list eth0 | awk '/inet /{sub(/\/[0-9]+/,"",$2); print $2}'
    OR
    ifconfig eth0 | awk '/inet /{print $2}'
    10.41.143.156
  • I'm going to use IP address 10.41.143.156 for testing purpose. Feel free to replace this IP address with your actual private or public IP address.
Enough talk, let's set up LAMP stack.

Step #1: Install Apache on a CentOS 7 / RHEL 7 server

Type the following yum command to install Apache web-server:
sudo yum install httpd
Sample outputs:
Loaded plugins: amazon-id, rhui-lb
Resolving Dependencies
--> Running transaction check
---> Package httpd.x86_64 0:2.4.6-17.el7 will be installed
--> Processing Dependency: httpd-tools = 2.4.6-17.el7 for package: httpd-2.4.6-17.el7.x86_64
--> Processing Dependency: /etc/mime.types for package: httpd-2.4.6-17.el7.x86_64
--> Running transaction check
---> Package httpd-tools.x86_64 0:2.4.6-17.el7 will be installed
---> Package mailcap.noarch 0:2.1.41-2.el7 will be installed
--> Finished Dependency Resolution
 
Dependencies Resolved
 
======================================================================================================
 Package            Arch          Version               Repository                               Size
======================================================================================================
Installing:
 httpd              x86_64        2.4.6-17.el7          rhui-REGION-rhel-server-releases        1.2 M
Installing for dependencies:
 httpd-tools        x86_64        2.4.6-17.el7          rhui-REGION-rhel-server-releases         77 k
 mailcap            noarch        2.1.41-2.el7          rhui-REGION-rhel-server-releases         31 k
 
Transaction Summary
======================================================================================================
Install  1 Package (+2 Dependent packages)
 
Total download size: 1.3 M
Installed size: 3.9 M
Is this ok [y/d/N]: y
Downloading packages:
(1/3): httpd-tools-2.4.6-17.el7.x86_64.rpm                                     |  77 kB  00:00:00
(2/3): httpd-2.4.6-17.el7.x86_64.rpm                                           | 1.2 MB  00:00:00
(3/3): mailcap-2.1.41-2.el7.noarch.rpm                                         |  31 kB  00:00:00
------------------------------------------------------------------------------------------------------
Total                                                                 2.0 MB/s | 1.3 MB  00:00:00
Running transaction check
Running transaction test
Transaction test succeeded
Running transaction
  Installing : httpd-tools-2.4.6-17.el7.x86_64                                                    1/3
  Installing : mailcap-2.1.41-2.el7.noarch                                                        2/3
  Installing : httpd-2.4.6-17.el7.x86_64                                                          3/3
  Verifying  : mailcap-2.1.41-2.el7.noarch                                                        1/3
  Verifying  : httpd-tools-2.4.6-17.el7.x86_64                                                    2/3
  Verifying  : httpd-2.4.6-17.el7.x86_64                                                          3/3
 
Installed:
  httpd.x86_64 0:2.4.6-17.el7
 
Dependency Installed:
  httpd-tools.x86_64 0:2.4.6-17.el7                   mailcap.noarch 0:2.1.41-2.el7
 
Complete!
 

Enable the httpd service at boot time

To make sure the httpd service start automatically at the boot time, enter:
sudo systemctl enable httpd.service
Sample outputs:
ln -s '/usr/lib/systemd/system/httpd.service' '/etc/systemd/system/multi-user.target.wants/httpd.service'
The following command will disable the httpd service at the boot time:
sudo systemctl disable httpd.service
Sample outputs:
rm '/etc/systemd/system/multi-user.target.wants/httpd.service'

Start the httpd service on a CentOS/RHEL v7.x

sudo systemctl start httpd.service
At this stage, you can point your web-browser to your server's IP address such as http://10.41.143.156). The following page should display on screen:
Fig.01: Check if Apache is Running on CentOS/RHEL 7 server

Stop the httpd service on a CentOS/RHEL v7.x

sudo systemctl stop httpd.service

Restart the httpd service on a CentOS/RHEL v7.x

sudo systemctl restart httpd.service

Finding the httpd service status on a CentOS/RHEL v7.x

To verify that the httpd service is running, enter:
systemctl is-active httpd.service
Sample outputs:
active

Gracefully restart the httpd service on a CentOS/RHEL v7.x

sudo apachectl graceful

Test httpd/Apache configuration file for errors on a CentOS/RHEL v7.x

sudo apachectl configtest
Sample outputs:
Syntax OK

httpd service default configuration

  1. Default config file: /etc/httpd/conf/httpd.conf
  2. Configuration files which load modules : /etc/httpd/conf.modules.d/ directory (e.g. PHP)
  3. Select MPMs (Processing Model) as loadable modules [worker, prefork (default)] and event:/etc/httpd/conf.modules.d/00-mpm.conf
  4. Default ports: 80 and 443 (SSL)
  5. Default log files: /var/log/httpd/{access_log,error_log}

Step #2: Install MariaDB on a CentOS 7 / RHEL 7 server

MariaDB An enhanced, drop-in replacement for MySQL server. RHEL/CentOS v7.x shifts from MySQL to MariaDB for its database management system needs. Type the following yum command to install MariaDB server:
sudo yum install mariadb-server mariadb
To start mariadb, type:
sudo systemctl start mariadb.service
To make sure the mariadb service start automatically at the boot time, enter:
sudo systemctl enable mariadb.service
Sample outputs:
ln -s '/usr/lib/systemd/system/mariadb.service' '/etc/systemd/system/multi-user.target.wants/mariadb.service'
To stop/restart and disable mariadb service use the following commands:
sudo systemctl stop mariadb.service #<-- Stop mariadb server
sudo systemctl restart mariadb.service #<-- Restart mariadb server
sudo systemctl disable mariadb.service #<-- Disable mariadb server
sudo systemctl is-active mariadb.service   #<-- Is mariadb server running?

Securing MariaDB

Type the following command:
sudo /usr/bin/mysql_secure_installation
Sample outputs:
NOTE: RUNNING ALL PARTS OF THIS SCRIPT IS RECOMMENDED FOR ALL MariaDB
      SERVERS IN PRODUCTION USE!  PLEASE READ EACH STEP CAREFULLY!
In order to log into MariaDB to secure it, we'll need the current
password for the root user.  If you've just installed MariaDB, and
you haven't set the root password yet, the password will be blank,
so you should just press enter here.
Enter current password for root (enter for none): PRESS-ENTER-KEY
OK, successfully used password, moving on...
Setting the root password ensures that nobody can log into the MariaDB
root user without the proper authorisation.
Set root password? [Y/n] Y
New password: YOUR-NEW-PASSWORD-HERE
Re-enter new password: YOUR-NEW-PASSWORD-HERE
Password updated successfully!
Reloading privilege tables..
 ... Success!
By default, a MariaDB installation has an anonymous user, allowing anyone
to log into MariaDB without having to have a user account created for
them.  This is intended only for testing, and to make the installation
go a bit smoother.  You should remove them before moving into a
production environment.
Remove anonymous users? [Y/n] Y
 ... Success!
Normally, root should only be allowed to connect from 'localhost'.  This
ensures that someone cannot guess at the root password from the network.
Disallow root login remotely? [Y/n] Y
 ... Success!
By default, MariaDB comes with a database named 'test' that anyone can
access.  This is also intended only for testing, and should be removed
before moving into a production environment.
Remove test database and access to it? [Y/n] Y
 - Dropping test database...
 ... Success!
 - Removing privileges on test database...
 ... Success!
Reloading the privilege tables will ensure that all changes made so far
will take effect immediately.
Reload privilege tables now? [Y/n] Y
 ... Success!
Cleaning up...
All done!  If you've completed all of the above steps, your MariaDB
installation should now be secure.
Thanks for using MariaDB!

Test MariaDB installation

Type the following command
mysql -u root -p
Sample outputs:
Fig.02: Mariadb test connection on a CentOS / RHEL Linux v7.x

Step #3: Install PHP on a CentOS/RHEL v7.x

To install PHP and modules such as gd/msyql type the following yum command:
sudo yum install php php-mysql php-gd php-pear
You must restart the httpd (Apache) service, enter:
sudo systemctl restart httpd.service
To search all other php modules, type:
sudo yum search php-
Sample outputs:
php-cli.x86_64 : Command-line interface for PHP
php-common.x86_64 : Common files for PHP
php-gd.x86_64 : A module for PHP applications for using the gd graphics library
php-ldap.x86_64 : A module for PHP applications that use LDAP
php-mysql.x86_64 : A module for PHP applications that use MySQL databases
php-odbc.x86_64 : A module for PHP applications that use ODBC databases
php-pdo.x86_64 : A database access abstraction module for PHP applications
php-pear.noarch : PHP Extension and Application Repository framework
php-pecl-memcache.x86_64 : Extension to work with the Memcached caching daemon
php-pgsql.x86_64 : A PostgreSQL database module for PHP
php-process.x86_64 : Modules for PHP script using system process interfaces
php-recode.x86_64 : A module for PHP applications for using the recode library
php-soap.x86_64 : A module for PHP applications that use the SOAP protocol
php-xml.x86_64 : A module for PHP applications which use XML
php-xmlrpc.x86_64 : A module for PHP applications which use the XML-RPC protocol
To find more info about a module type:
sudo yum info php-pgsql
To install php module called php-pgsql type:
sudo yum install php-pgsql

Test PHP on your server

Create a file called /var/www/html/test.php as follows:
sudo vi /var/www/html/test.php
Append the following code:
 
<?php
   phpinfo(INFO_GENERAL);
?>
 
Save and close the file. Point your web-browser to your server's IP address such as http://10.41.143.156/test.php (feel free to replace the 10.41.143.156 with your actual IP address):
http://10.41.143.156/test.php
Sample outputs:
Fig.03: Test Apache+PHP with phpinfo() On a CentOS/RHEL v7.x server
In next part, I will cover the following topics (rss feed for RHEL7 or rss for CentOS7 tutorials):
  1. Apache configuration
  2. Virtual hosting
  3. Apache security
  4. mod_ssl
  5. Perl
  6. Firewall configuration

วันพุธที่ 3 กันยายน พ.ศ. 2557

การติดตั้ง upgrade mysql percona บน CentOS

การติดตั้ง upgrade mysql percona บน CentOS

วิธี upgrade mysql บน CentOS แบบคร่าวๆนะครับ

1. check version mysql โดยใช้คำสั่ง mysql --version

2. download version mysql ที่ต้องการมาใช้
(ในที่นี้แนะนำ mysql ของ percona นะครับ)
ที่นี่ http://www.percona.com/downloads/

3. ไฟล์ที่ใช้ในการติดตั้งจะต้องมีไฟล์ client , shared , server นะครับ ชื่อไฟล์จะมีคำเหล่านี้อยู่นะครับ เช่น
MySQL-client-percona-5.5.xx-x.rhel6.x64_i86.rpm
MySQL-shared-percona-5.5.xx-x.rhel6.x64_i86.rpm
MySQL-server-percona-5.5.xx-x.rhel6.x64_i86.rpm


4. เมื่อได้ไฟล์นั้นมาแล้ว stop mysql ก่อน
  service Mysql stop;

5. จากนั้นถอนของเก่าออกโดยใช้คำสั่ง ดังนี้
#yum remove mysql
#yum remove mysql-server
(คำสั่งนี้จะลบโปรแกรมออกแต่ข้อมูลไม่หายไป)

6. จากนั้นติดตั้ง version ใหม่เข้าไปโดยใช้คำสั่ง
#rpm -ivh --nodeps --force MySQL-client-percona-5.5.xx-x.rhel6.x64_i86.rpm
#rpm -ivh --nodeps --force MySQL-shared-percona-5.5.xx-x.rhel6.x64_i86.rpm
#rpm -ivh --nodeps --force MySQL-server-percona-5.5.xx-x.rhel6.x64_i86.rpm

7. จากนั้นเมื่อติดตั้งเสร็จเรียบร้อยแล้วให้ใช้คำสั่ง upgrade mysql โดยใช้คำสั่งดังนี้

#mysql_upgrade -u root

แล้วรอจนกว่าจะเสร็จ เป็นอันเสร็จสิ้นกระบวนการ
ปล.ระวัง เรื่อง my.cnf ถ้าอัพจาก version เก่าๆมา เป็น 5.5.xx
จะมีบางฟังชั่นใช้งานไม่ได้ ตอนลงเสร็จแล้วจะ start mysql ไม่ได้ครับ ที่นึกออกที่ต้องเข้าไปแก้จะมี
1. default-character-set=tis620 จะใช้ไม่ได้ให้ comment เอาไว้ แล้วเปลี่ยนเป็น
 character-set-server=tis620 เป็นต้น
2. skip-locking ให้ comment เอาไว้อีกเช่นกัน

ปล2.ทุกการกระทำมีความเสี่ยงกรุณาทำด้วยความระมัดระวัง ด้วยความหวังดี  จาก realaerm@hosxp 
ข้อมูลจาก http://nahaeo-hospital.blogspot.com/2013/06/upgrade-mysql-percona-centos.html

วันศุกร์ที่ 13 มิถุนายน พ.ศ. 2557

คำสั่ง SQL เบื้องต้น

ผมไปเจอในเว็บคิดว่ามีความจำเป็นต้องใช้เลยเก็บเอามาไว้อ่านกัน
 
เครดิตจาก  http://natsusencho.blogspot.com/2012/08/sql-language.html  ครับ

คำสั่ง SQL เบื้องต้น by natsu


ก่อนอื่นต้องบอกเลยครับว่ามันไม่ได้ดีมากนักสำหรับหน้าเวปนี้เพราะผมอ่านหนังสือและสรุปอย่างคร่าวๆ แล้วรูปแบบมันอาจจะเพี้ยนๆ เพราะผมเขียนใน PAGE แล้วเอา COPY and PASTE ลงเล้ย แบบไม่แก้ไขอันใด tab มั่วไปหมด ถ้าผิดพลาดประการใดต้องขออภัยด้วยครับ


ภาษา SQL นั้นไม่เป็น case sensitive (ตัวเล็ก ตัวใหญ่มีค่าเท่ากัน) และในแต่ละคำสั่งจะถูกปิดด้วย ; (semi-colon) 
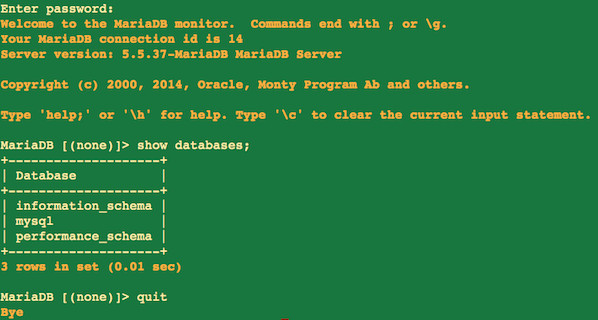
การเข้าใช้ให้เราเปิด cmd ขึ้นมาและ
$ mysql -u root -p
จากนั้นใส่ password ลงไป
จะเข้าสู่การใช้ mysql >
ถ้าต้องการออกใช้
mysql > quit
mysql > show databases; แสดง  databases ทั้งหมดที่เราสร้างขึ้น
mysql > use <ชื่อ database> เป็นการเข้าใช้ database นั้นๆ
mysql > SELECT database(); ดู database ที่เรากำลังใช้อยู่
mysql > show tables; แสดงตารางทั้งหมดที่เราสร้างขึ้นใน database ที่ use
สร้าง DATABASE
mysql > create database  <ชื่อdatabase>;
เช่น create database world;
สร้าง table
mysql > create table <ชื่อtable> (<ชื่อข้อมูล> <ชนิดข้อมูล>, ... );
เช่น create table human (name VARCHAR(20), birth DATE, sex CHAR(1));
ชนิดข้อมูล เช่น
VARCHAR(n) - ข้อมูลชนิด string เก็บแบบ linked list เหมาะสมกับข้อมูลที่มีความยาวที่ไม่แน่นอน
CHAR(n) - ข้อมูลชนิด string เก็บแบบ array เหมาะสมกับข้อมูลที่มีความยาวที่แน่นอน
INT - จำนวนเต็ม
DATE - ข้อมูลชนิดพิเศษของ SQL ใช้เก็บวันที่ มีรูปแบบเป็น YYYY-MM-DD
ดูชื่อและชนิดข้อมูลของแต่ละตาราง
mysql > describe <ชื่อtable>;
การใส่ข้อมูลลงไปใน table
  1. ใช้คำสั่ง load data จากไฟล์ที่เราเตรียมไว้ โดย default จะแบ่งเนื้อหาโดยใช้ tab แบบนี้จะมีปัญหาเรื่องการใช้ข้อมูลชนิด NULL ซึ่งใช้ \N แทน
mysql > load data local infile ‘natsu.txt’ into table pet;
  1. INSERT ใส่ทีละข้อมูล เหมาะกับข้อมูลที่น้อยๆ ที่เราเพิ่มเติมเข้าไป เช่น
mysql > INSERT INTO pet
                    -> VALUES (‘natsusencho’, ‘1992-03-25’, ‘M’);
  1. *ทำ SQL script คือเตรียมไฟล์คำสั่ง sql ไว้แล้วนำมาทำการ source ทีเดวเช่น
  ---- file natsu.sql ----
CREATE TABLE IF NOT EXISTS human (
       name   VARCHAR(20),
       birth DATE, 
sex CHAR(1) );
INSERT INTO human VALUES 
      ( 'NatsuSencho',   '1992-03-25', 'M'),
      ( 'Slime',   '1999-03-03', NULL ),
  ( ‘HeyFemale’ , ‘1993-12-25’ , ‘F’);
----- file natsu.sql -----
หลังจากสร้างเสร็จแล้วก้ลองใช้คำสั่ง
mysql > source natsu.sql;
ก็จะได้ตาราง world หน้าที่มีข้อมูล 3 ตัว
create table IF NOT EXISTS human
คำว่า IF NOT EXISTS หมายถึงการสร้าง table นี้ถ้ายังไม่มี table นี้ ถ้ามีแล้วก็ไม่ต้องสร้าง
มีสร้างก็ต้องมีลบ การลบ table ใช้คำสั่ง
mysql > DELETE FROM <ชื่อtable>;
หลังจากที่สร้างเป็นแล้วต้องสามารถแก้ไขข้อมูลได้
mysql > UPDATE <ชื่อtable> 
SET <ชื่อข้อมูล> = <ข้อมูลใหม่>
WHERE <เงื่อนไขอื่นๆ>;
เช่น UPDATE human SET name = ‘HeyGirl’ WHERE name = ‘HeyFemale’;
การสืบค้นข้อมูล
SELECT <สิ่งที่ต้องการ>
FROM   <ชื่อtable>
WHERE <เงื่อนไขอื่นๆ>
เช่นต้องการชื่อของข้อมูลในตาราง human ที่มีมีเพศชาย
SELECT name
FROM   human
WHERE sex = ‘M’; 
ต้องการดูข้อมูลทั้งหมดในตาราง human [* คือทั้งหมด]
SELECT *
FROM   human;
ซึ่งการกำหนดเงื่อนไขนั้นเราสามารถใช้ตัวแปรทางคณิตศาสตร์ตรรกะ มาช่วยได้เช่น
AND - และ OR - หรือ
< - น้อยกว่า > - มากกว่า
<= น้อยกว่าหรือเท่ากับ
>= มากกว่าหรือเท่ากับ
<> ไม่เท่ากับ
UNION - การนำ 2 ตารางมาเชื่อมต่อกันตัดตัวซ้ำ
  UNION ALL - การนำ 2 ตารางมาเชื่อมกันโดยไม่ตัดตัวซ้ำ
INTERSECT - ข้อมูลที่ซ้ำกัน
DISTINCT คือการตัดตัวที่ซ้ำกันออก
เช่น SELECT DISTINCT sex
FROM   human;
ORDER BY เรียงลำดับข้อมูล การจัดกลุ่มข้อมูล
เรียงลำดับจากมากไปน้อย (descending order)
เช่น SELECT *
FROM   human
ORDER BY name;
เรียงลำดับจากน้อยไปมาก (descending order)
เช่น SELECT *
FROM   human
ORDER BY name DESC;
ถ้าต้องการมากกว่าอันนึงก็ย่อมได้
เช่น SELECT *
FROM   human
ORDER BY name , sex DESC ;
แบบนี้จะจัดตามชื่อแบบ ascending ก่อนแล้วจะมาจัดเพศแบบ descending ทีหลัง
การคำนวณเกี่ยวกับวันที่
ตัวแปร DATE เป็น string ที่มีการเก็บเป็นรูปแบบ YYYY-MM-DD ตัวแปรชนิด DATE สามารถนำมาเทียบค่ากันได้ในระดับ ASCII
CURDATE() จะเป็น function ที่ส่งค่าออกมาเป็นข้อมูลรูปแบบ DATE (YYYY-MM-DD)
YEAR(<ข้อมูลชนิดdate>) ส่งค่าออกมาเป็นข้อมูลรูปแบบของปี (YYYY)
MONTH(<ข้อมูลชนิดdate>) ส่งค่าออกมาเป็นข้อมูลรูปแบบของเดือน (MM)
DAY(<ข้อมูลชนิดdate>)  ส่งค่าออกมาเป็นข้อมูลรูปแบบของวัน (DD)
RIGHT(<ข้อมูลชนิดstring>, <จำนวนตัวเลข>) ส่งค่าออกมาจำนวนเท่ากับที่เราต้องการตัดออกมาจาก string นั้นๆ โดยเริ่มนับจากทางขวา
LEFT(<ข้อมูลชนิดstring>, <จำนวนตัวเลข>) ส่งค่าออกมาจำนวนเท่ากับที่เราต้องการตัดออกมาจาก string นั้นๆ โดยเริ่มนับจากทางซ้าย
ตัวอย่าง
ex1. ต้องการปีของวันปัจจุบัน YEAR( CURDATE() )
ex2. ต้องการเดือนและวันของปัจจุบัน RIGHT( CURDATE(),5 )
[5 ในที่นี้คือนับจากทางขวามือมา YYYY-MM-DD ก็จะได้ ​MM-DD มา]
การใช้ตัวแปร NULL ในเงื่อนไข
ใช้คำสั่ง xxx IS NOT NULL เช่นต้องการดูสิ่งมีชีิวิตที่ไม่มีเพศ
SELECT *
FROM   human
WHERE sex IS NOT NULL;
การตั้งชื่อเป็นชื่อที่เราต้องการ
หมายถึงเวลา select บางทีคนทั่วไปอาจจะไม่เข้าใจว่าคืออะไร เราจึงมีคำสั่ง AS ช่วย เช่น
SELECT name AS ‘NAME-SURNAME’
FROM   human;
COUNT การนับจำนวน + GROUP BY การจัดกลุ่ม
COUNT ใช้ในการนับจำนวนของตารางต่างๆ จะใช้คู่กับ GROUP BY ได้ดีเพราะจะช่วยในการจัดกลุ่มชุดข้อมูลได้ดีขึ้น
SELECT <อื่นๆ> COUNT(*)
FROM <ชื่อtable>
WHERE <เงื่อนไข>
GROUP BY <จัดกลุ่มโดยใช้อะไร>
เช่นต้องการนับจำนวนคนในแต่ละเพศ
SELECT sex , COUNT(*)
FROM   human
GROUP BY sex;
SET การกำหนดตัวแปร
SET @<ชื่อตัวแปร> = <ค่า>
เช่น  SET @A1 = ‘Natsu Sencho’;
SET @A2 = ‘1999-09-09’;
การใช้คำสั่ง JOIN
การ JOIN คือการนำตารางที่มีความสัมพันธ์ของข้อมูลในแต่ละฟิลมาเชื่อมโยงกัน
การ JOIN มี 2 แบบคือ
1. INNER JOIN
2. OUTER JOIN  |--- LEFT JOIN
|--- RIGHT JOIN
INNER JOIN
คือการ JOIN โดยไม่สนใจค่า NULL จะดูเพียงตัวที่เหมือนกันเท่านั้น
สมมติมีตาราง 2 อันชื่อ Ltable และ ​Rtable นำมา JOIN กันโดยมีข้อมูลที่ซ้ำกันคือ id
-- JOIN โดยใช้ ON
SELECT *
FROM Ltable INNER JOIN Rtable ON Ltable.id = Rtable.id;
-- หรือ JOIN โดยใช้ USING
SELECT *
FROM Ltable INNER JOIN Rtable USING (id);
กรณีพิเศษที่ตัวแปรหรือชื่อ Column ซ้ำกันก็สามาใช้ NATURAL JOIN ได้ อย่างในที่นี้เรารุ้ว่า id นั้นซ้ำกันเราก็ไม่ต้องใส่เงื่อนไขใดๆ แต่ใช้ Natural Join เข้ามาช่วยโดย
SELECT *
FROM Ltable NATURAL JOIN Rtable;
OUTER JOIN
  • LEFT JOIN
คือการ JOIN โดยใช้ตัวทางซ้ายเป็นหลักคือ จะแสดงตัวทางซ้ายทุกตัวและนำข้อมูลขวามาเชื่อม
SELECT *
FROM Ltable LEFT JOIN Rtable ON Ltable.id = Rtable.id;
  • RIGHT JOIN
คือการ JOIN โดยใช้ตัวทางขวาเป็นหลักคือ จะแสดงตัวทางขวาทุกตัวและนำข้อมูลขวามาเชื่อม
SELECT *
FROM Ltable RIGHT JOIN Rtable ON Ltable.id = Rtable.id;
นอกจากวิธีการ JOIN ยังมีวิธีที่เรียกว่า Cartesian Product ซึ่งไม่ได้อทิบายไว้ในทีนี้
ถ้ามีโอกาศจะนั่งทำตัวอย่างให้ดูให้เห็นได้ชัดกว่านี้นะครับ แต่ผมสรุปแบบคร่าวๆ ให้พอดู
รวมคำศัพท์คำสั่งที่เจอเพจนี้
CREATE สร้างdatabase, table
INSERT ใส่ข้อมูล
UPDATE อัพเดตข้อมูล
SELECT ต้องการจะดูอะไรบ้าง
FROM จากที่ไหน
WHERE เงื่อนไขอย่างไร
COUNT(*) นับจำนวนของฟิลข้อมูล
GROUP BY จัดกลุ่มข้อมูล
ORDER BY เรียงลำดับข้อมูลโดย
JOIN เชื่อมตาราง
DISTINCT ตัดตัวซ้ำ
AS ใช้คำใหม่ให้กระทัดรัดขึ้น
SET กำหนดตัวแปร
CURDATE() วันที่ปัจจุบัน
YEAR() ปี
MONTH() เดือน
DAY() วัน
RIGHT() ตัดคำจากทางขวา
LEFT() ตัดคำจากทางซ้าย
* ทั้งหมด

อ้างอิง : เอกสารประกอบการสอนวิชา Databases โดยอาจารย์จิระ 2012 มหาวิทยาลัยบูรพา